Tutorial 1: Java Game Development: Creating Fun With Your ODROID #2
Pong Clone, Keyboard, Mouse, Gamepad, GPIO Gamepad Input
-
Author: Brian A. Ree
Sections
For questions or issues with this tutorial please send an email here.
- 0: Environment Setup
- 1: Introduction and Tutorial Goals
- 2: The API Structure
- 3: Game Engine Features
- 4: Project Files and Folders
- 5: Project Classes, MmgPongClone, MainMenu, GamePanel
- 6: Project Classes, ScreenMainMenu, ScreenGame
- 7: Setting Up USB Gamepad Input
- 8: Setting Up GPIO Gamepad Input
- 9: Conclusion
Software and Scripts
The software and scripts used in this tutorial can be downloaded at the following links. There are also links provided in the tutorial at the step where they are needed. I've placed a set of links here for convenience.
Link: GPIO Scripts v2.0.0 (Up, Down Button)
Link: Mmg Game API Netbeans Project v0.5.1
Link: Odroid Game Project v0.1.0
-- 0: Environment Setup --
In order to take full advantage of this tutorial you'll need to have your ODROID development environment setup. A detailed tutorial on how to build and configure an ODROID-N2 environment can be found at the following link.
Click here for the ODROID-N2 Game Development Environment Setup Tutorial
**There was a mistake in the first tutorial. I forgot to mention you'll have to install the default-jdk.
sudo apt-get install default-jdk -y;
-- 1: Introduction and Tutorial Goals --
This tutorial is the second part of the in a series of tutorials about ODROID-N2 game development using Java. It is designed for those who are starting out in game development and just learning how to code. In order to take full advantage of this tutorial series you'll need to setup an ODROID-N2 development environment. The link above has a detailed tutorial on getting your environment up and running.
We'll create our first game in this, tutorial #2, a clone of the classic game, Pong. This tutorial will focus on the classes that power the game and only briefly mention the underlying APIs and supporting classes. You'll get more experience with then and I'll cover a little bit more about how the API works as we progress in this tutorial series.
This tutorial will expose you to Java, Java programming, GPIO, and general topics that will help you when writing your own games. You'll also get free code to use, including source, so you can explore on your own and further your knowledge of software and game development.
-- 2: The API Structure --
Let's take a look at some of the features of the code we're using starting with the overall structure of the API's. An API is an Application Programming Interface and is really a fancy way of saying "a collection of classes, interfaces, enumerations and packages that are designed to work together and accomplish a specific task." If you are new to programming then the last sentence will probably make almost no sense to you so I'll go over some of the definitions of key words. This should help you develop your understanding of what coding in Java entails.
Class: A class is a user defined blueprint or prototype from which objects are created. It represents the set of properties or methods that are common to all objects of one class type. For instance in 2D game programming you need to draw 2D images to the screen a class that handles keeps track of the information involved, image size, image position, etc, could be called a GameObject. In this project the objects being drawn to the screen are instances of the MmgObj class.
Click here for more info.
Interface: An interface is a reference type in Java. It is similar to class. It is a collection of abstract methods. A class implements an interface, thereby inheriting the abstract methods of the interface. Think of this as a defining a general protocol, a general way of doing something. One interface contained in the provided API is GamePadSimple. This creates a template for handling gamepad input. It doesn't define exactly how to do it, it only defines a template on how to handle input, handling direction pad input, handling A button presses, etc. We don't case what class implements the interface and how it implements the interface we just care that the classes that do so all handle the same methods, fancy word for functions, so they can be used in the same way.
Click here for more info.
Enumeration: Enumeration means a list of named constant. In Java, enumeration defines a class type. A simple enumeration might be the days in a week, and you would see a list of those days in the enumeration definition. In the code provided we have a lot of enumeration but one main enumeration is one that lists different game states. For example splash screen, loading screen, main menu. Many of these screens are common to every game so it makes sense to define them in an enumeration.
Click here for more info.
Packages: A package in Java is used to group related classes. Think of it as a folder in a file directory. In Java common classes, classes that are designed to work together are grouped into a package.
Click here for more info.
Now that you have a deeper understanding of some Java fundamentals let's take a look at the code included with this tutorial. If you've completed the first tutorial you'll need to download the updated code. Each tutorial will come with it's own full set of source code and libraries with updates and fixes to lower level classes that might not be in copies from other tutorials. The overall structure of the API's involved with the game development library are shown below.
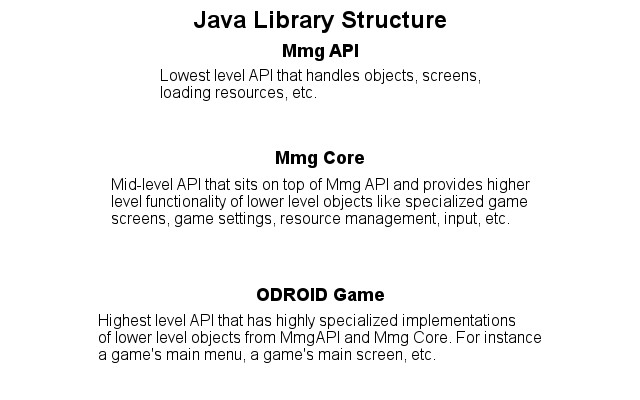
Review the image above and make sure you understand, at least a little bit, what's going on. You'll get more experience with the actual code in just a bit so that may help your understanding. The key thing to realize is that each API is designed to handle a focused task. The MmgApi is lower level and responsible for things like drawing images, creating new images, loading image files, defining events, game screens, etc.
The MmgCore API is a slightly higher level API. This means that it is more specialized. It uses the MmgApi but adds to it, almost directing the functionality of the more general lower level API into a narrow, more focused, usage. For instance the game screens in the core API are splash, loading, and main menu. These are screens that are very game oriented. The API adds a lot of support for loading and managing game settings, handling input from different devices, drawing to a window on your screen, etc.
Lastly the package for the actual game sits on top of the core API. This creates almost a stack of libraries with each one becoming more focused and uses the generalized power of the API below it. So for instance the core API is designed to draw a very general definition of splash, loading, and main menu screens the classes in the game's package, Odroid_Tutorial2_PongClone, are designed to draw screens customized for the Pong clone game. I'll refer the the set of API's, MmgApi and MmgCore as the Game Engine because they work together to provide the foundation of a Java 2D game for your ODROID-N2.
-- 3: Game Engine Features --
In this section we'll cover some key game engine features. The first things I'll mention is the ability to configure the GameSettings class from an XML file. This allows you to load game specific data, at runtime, without recompiling the game. It's used to set game specific resource directories, images and sounds, without having to hardcode the changes in the GameSettings class. Below is a screen shot of the engine config file used in the Pong clone game.
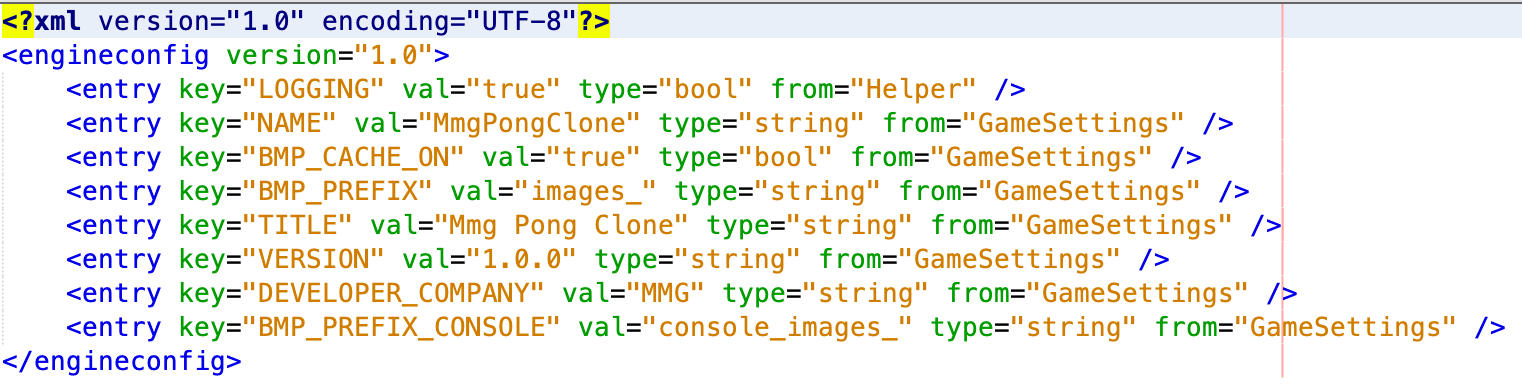
Now I won't go into too much depth here about XML files. Just think of it as a structured way to store data that can be easily read by methods setup in your Java game. Secondly the information set in the engine config file is used to set the values of static class fields. Classes have fields, they are sometimes also referred to as attributes or properties. They are essential aspects of how a class is defined. You can think of them as the pieces of information an instance of a particular class will keep track of. Now I just said instance. An instance of a class is a unique copy of a class created by using the new key word. An example would be MmgObj myObj = new MmgObj(). That line of code creates a new instance, or copy, of the MmgObj class. Sometimes it makes sense to create classes with static fields. Think of these a global to all copies of that class.
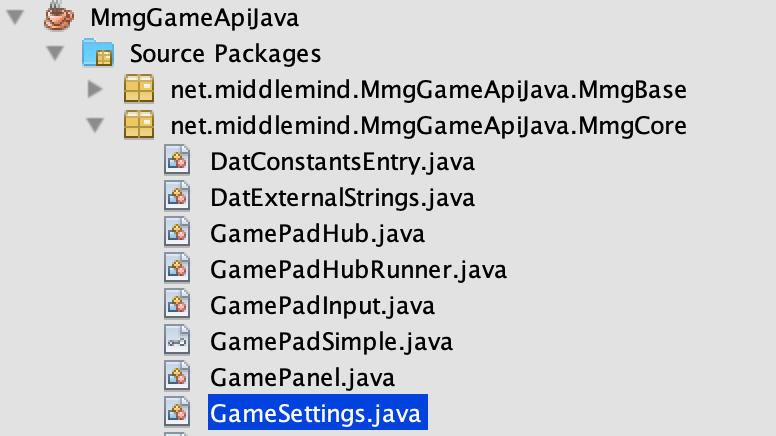
An example of static class fields can be found in the MmgCore API's GameSettings class. Go to the MmgGameApiJava project and expand the MmgCore API's package to browse the Java classes it contains to find the file. Because we want to share those settings we don't really need an instance of the GameSettings class because that would create a unique copy with potentially different data. What we want is a simple class with static fields that can be accessed anywhere. Normally you would reference class fields by using an instance of that class. To build on the example in the previous paragraph you would access fields and methods of the myObj class instance like this, myObj.isVisible. If the isVisible class field were static we wouldn't need the myObj instance so we would reference this field like so, MmgObj.isVisible. This has the benefit of making access to the field simple and global.
We can apply this functionality to the GameSettings class and because all its fields are static fields we can set their values with the data from the XML engine config file. Notice that the name and title are being set to values that are specific to this game. If you look at the MmgPongClone class, this is the main execution class for the game. The file is located in the OdroidGameTutorialsJava project in the PongClone package. You'll see the following line near the top of the static main class, MmgPongClone. This allows us to load custom settings for our specific game.

Now that we have a specific name for our game loaded from a game specific engine config file we can focus on loading game specific resources. If you scroll down in the MmgPongClone class you'll see the two lines shown below.

The game engine is designed to load resources automatically. To do so the images and sounds have to be places in certain key folder. Two such folders are stored in the GameSettings.PROGRAM_IMAGE_LOAD_DIR and the GameSettings.PROGRAM_SOUND_LOAD_DIR static class fields. Notice above that those two folders are now customized by the name of the game. The game engine will inspect that folder and load any images found into a repository of game images. The same thing is done for sound files. Currently sound files are limited to wav files. Images can be loaded from most of the major types of images but I would recommend using png files whenever possible. An image of the key resource loading paths setup by default in the GameSettings class is shown below.
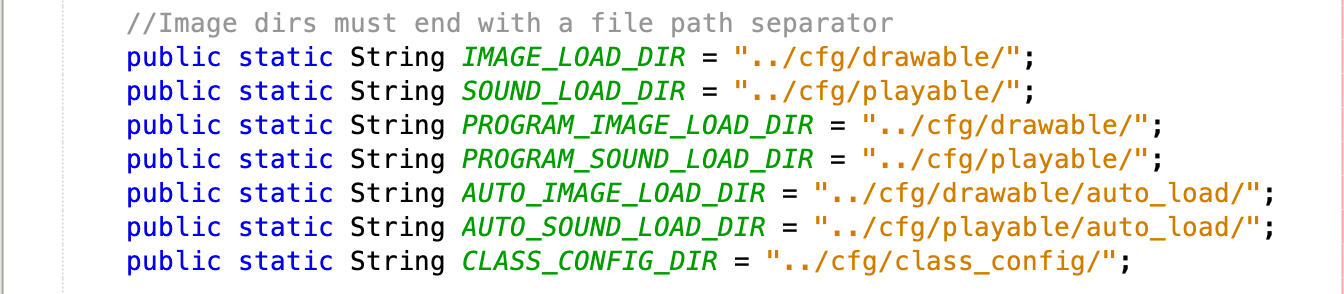
A detailed listing of what each resource path game setting is used for is shown below.
IMAGE_LOAD_DIR = "../cfg/drawable/": A directory for manually loading image files. Use this if you need to add custom loading of image resources to the RunResourceLoad class.
SOUND_LOAD_DIR = "../cfg/playable/": A directory for manually loading sound files. Use this if you need to add custom loading of sound resources to the RunResourceLoad class.
PROGRAM_IMAGE_LOAD_DIR = "../cfg/drawable/": A directory for automatically loading image files. The value of this static class field will get appended with the value of the NAME field. It is meant to be customized to point to a directory that has the same name as the game you're working on. This way automatic loading of images can be separated, game by game.
PROGRAM_SOUND_LOAD_DIR = "../cfg/playable/": A directory for automatically loading sound files. The value of this static class field will get appeneded with the value of the NAME field. It is meant to be customized to point to a directory that has the same name as the game you're working on. This way automatic loading of sounds can be separated, game by game.
AUTO_IMAGE_LOAD_DIR = "../cfg/drawable/auto_load/": A default directory for automatically loading image files. This is a non-custom directory used by the MmgCore API. You can use it too but your game files will get mixed in with the default images used by the API. It can serve as a quick use directory for loading up images and testing them out if you haven't setup your game fully yet.
AUTO_SOUND_LOAD_DIR = "../cfg/playable/auto_load/": A default directory for automatically loading sound files. This is a non-custom directory used by the MmgCore API. You can use it too but your game files will get mixed in with the default sounds used by the API. It can serve as a quick use directory for loading up sounds and testing them out if you haven't setup your game fully yet.
CLASS_CONFIG_DIR = "../cfg/class_config/": This is a special directory for storing class config files. I'll touch more on this later but a quick description is in order. As we build our screen classes we're going to add a way to configure them without editing the code. This is what a class config file is for. It allows you to load in strings, numbers, etc that drive the game screen so that you can adjust your game by editing a simple text file.
Well that wraps up this section of the tutorial. As you can see there are a lot of easy to use features that make creating a game simple. You don't have to really worry about loading resources that is taken care of automatically, if you put your files in the auto loading folders or the game specific auto loading folder. You also don't have to adjust your game screen once you create it because you can control the images and their position from the class config file. Pretty neat.
-- 4: Project Files and Folders --
In this section we'll quickly cover the files and folders associated with the Pong Clone project. I mentioned the code that stores the different directories in the previous section, here we'll take a quick look at those directories in action. I'll also show you what a class config file looks like. It's not an XML file, it's a simple text file with a few rules governing how information is read from the file. Let's take a look.
The first directory we'll take a look at is the class config folder.
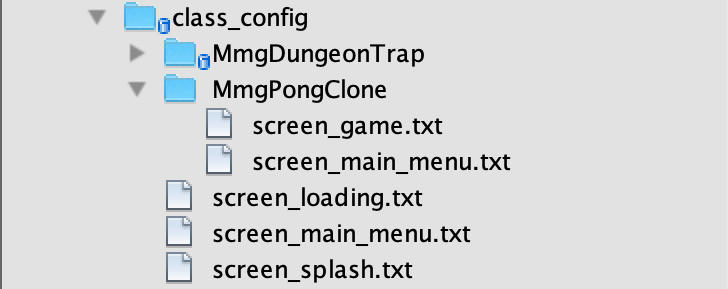
This folder holds configuration files for some of the game screens. The files including in the base directory are used by the MmgCore API. The API includes an example executable with some basic functionality so we have some class config files for it. Notice that the game specific class config files are stored in a folder that has the same name as the game. These files are handled a little bit differently than the game specific resource directories in that the class config path isn't automatically adjusted when the game starts. You design your code to point to the folder you want to load class config files for. This gives you more control and allows you to load up different files as needed. For instance you could load up one class config file for smaller screens and one for larger screen if you designed your code to handle multiple screens.
An example of a class config file is as follows. An there are some simple rules for them also listed below.
Comments: A commented line, ignored line, must start with the # character. It can't have any preceding white space so the character must appear at the left most position in the text file.
Key Name: The key name, or the name we use to reference the value after the file is loaded must be followed by a -> if the key is meant to store a string value, i.e. not a number. If the key is meant to store a number value then a = must follow the key.
#images and text
bmpGameTitle->mpc_game_title.png
bmpGameSubTitle->mpc_game_sub_title.png
bmpMenuItemStartGame1p->start_game_1p.png
bmpMenuItemStartGame2p->start_game_2p.png
bmpMenuItemExitGame->mpc_exit_game.png
bmpFooterUrl->mpc_footer_url.png
version->version:1.0.0


menuTitleScale=1.0
menuTitleOffsetY=-35
menuTitleOffsetX=0
#menuTitlePosY=30
#menuTitlePosX=0


menuSubTitleScale=1.0
menuSubTitleOffsetY=-10
#menuSubTitleOffsetX=0
#menuSubTitlePosY=0
#menuSubTitlePosX=0


menuStartGame1pScale=1.0
menuStartGame1pOffsetY=-15
#menuStartGame1pOffsetX=0
#menuStartGame1pPosY=-10
#menuStartGame1pPosX=0


menuStartGame2pScale=1.0
menuStartGame2pOffsetY=-15
#menuStartGame2pOffsetX=0
#menuStartGame2pPosY=-10
#menuStartGame2pPosX=0


menuExitGameScale=1.0
menuExitGameOffsetY=-15
#menuExitGameOffsetX=0
#menuExitGamePosY=-10
#menuExitGamePosX=0


menuFooterUrlScale=1.0
menuFooterUrlOffsetY=10
#menuFooterUrlOffsetX=0
#menuFooterUrlPosY=25
#menuFooterUrlPosX=0
Notice that there are entries for a couple of images. These images must be already auto loaded, using one of the afore mentioned directories, to be referenced with just a key. Make sure to notice that the image is referenced by its name, you'll see those images listed when we cover the drawable files in just a bit. To load a class config file you'll use a command similar to the following one.

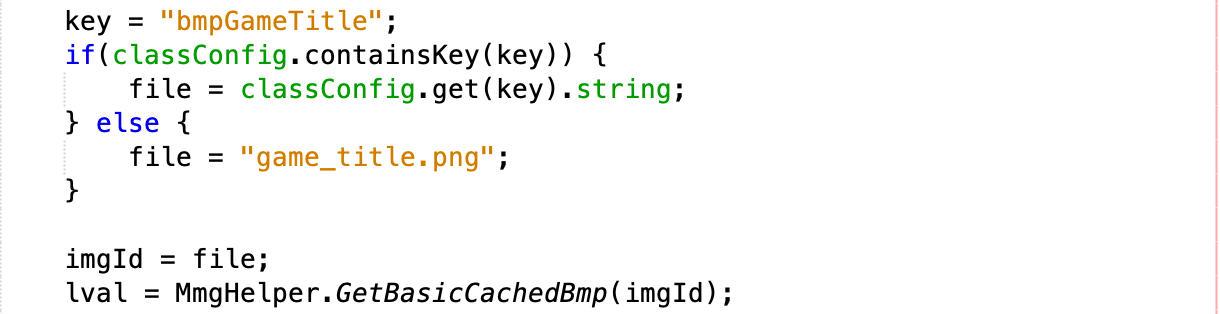
You can use the data loaded in many different way. In the above example we have the ability to set the image for certain screen elements, in this case on the main menu. We can also set a position offset, for adjusting the image position from its default and we can also set the position directly. Not every entry is used, some are commented out, but all entries should be visible in the class config file so you know what's available to you. An example of using the class config value to load a specific image file from the auto loaded image cache is as follows.
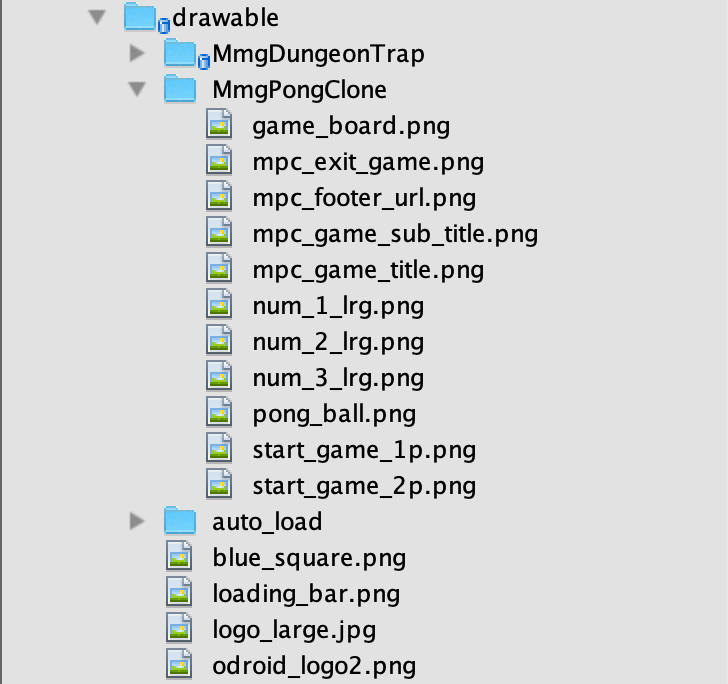
Let's take a look at the files and folders used for images next. Notice that the files shown are the ones referenced in the class config file we reviewed previously.
Lastly we have the playable resources, sound files.

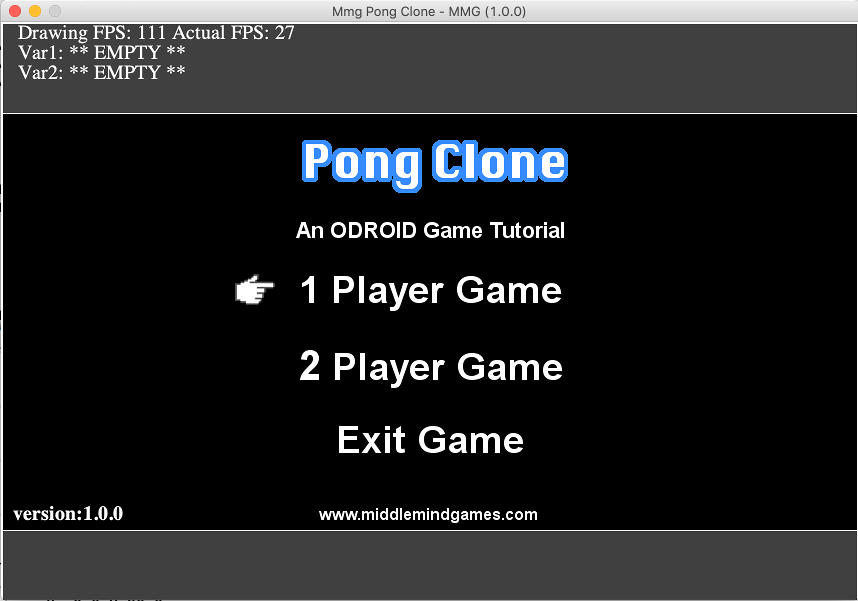
Before we move one let's take a look at the actual game screen as it is displayed by the game.
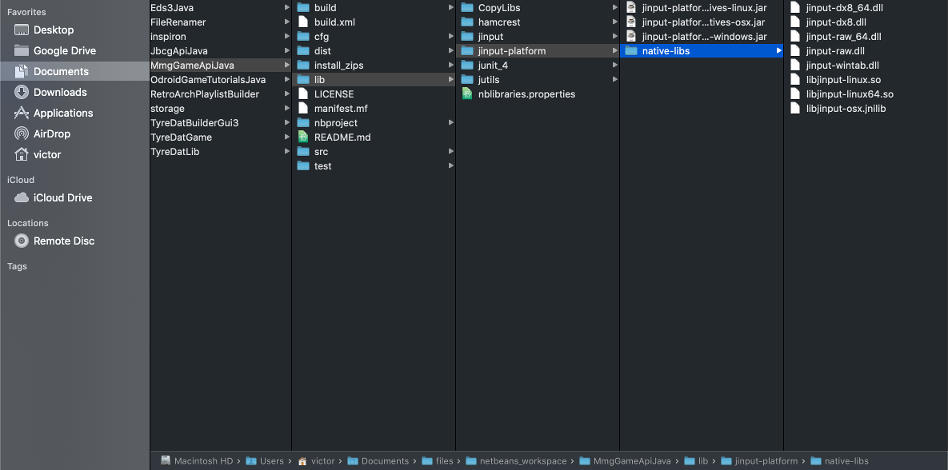
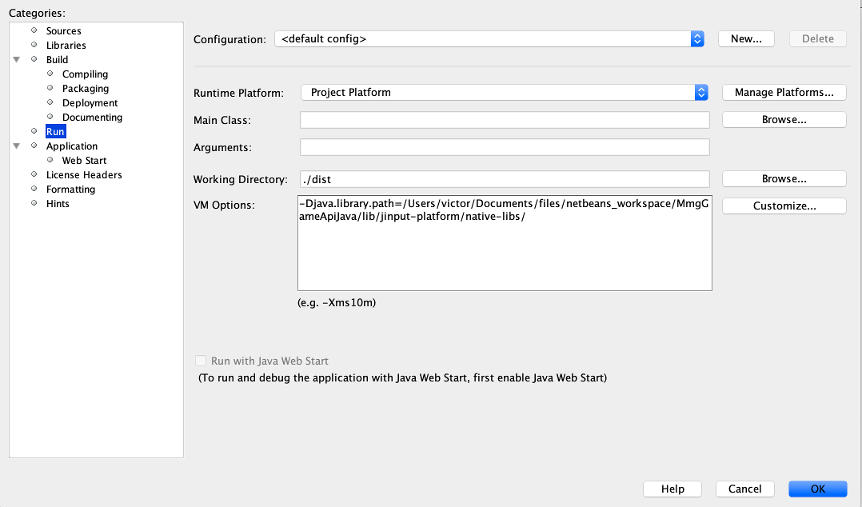
One last thing we want to cover in this section is the loading up of gamepad libraries. These are native libraries used by the game engine to add support for USB gamepads. Right click the OdroidGameTutorial project and select the run option on the left hand side menu. Notice that a path is registered here. This tells Java where to look for native libraries to load at runtime. You'll have to adjust the path to match the location of the project on your computer.
-- 5: Project Classes, MmgPongClone, MainMenu, GamePanel --
In this section we'll take a look at the classes that actually make up the game. Now there are a lot of underlying classes in the lower level APIs, MmgCore and MmgBase, but I can't cover all of that in this tutorial so we'll gain some knowledge about those APIs a little at a time. The following image shows the classes involved in the game and how they are structured, it also describes a little bit about what each one does.
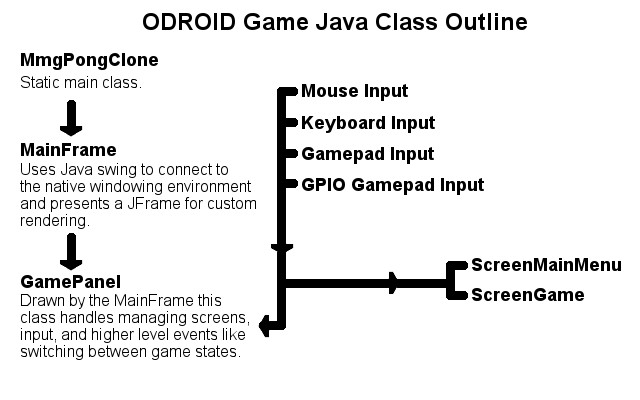
Notice that at the highest level things are really simple. We're only declaring 5 classes to run the game. That's because we're working on top of the foundation code provided by the lower level APIs. The MmgPongClone class is the static main entry point. When a project has multiple static main files you may need to select the file, right click on it, and select run file instead of trying to run the project itself. This is because there can only be one static main per package and it might not be mapped to the class you expect. The static main entry point takes care of the following responsibilities for us. You can read over the code on your own, I won't cover it line by line but I'll list the main aspects of the class.
Processes Command Line Arguments: We'll just be using the default values for the Pong Clone game but you can specify command line arguments to adjust the size of the game, if Open GL should be used, and a few other things.
Loads Engine Config: The engine config file is loaded and any static field values supported by the code are altered to use the values in the engine config file. We saw earlier how this could be used to change the program resource loading path by setting the name of the game at runtime.
Loads Native Libraries: Depending on the value of the GameSettings.LOAD_NATIVE_LIBRARIES static field the class will load the proper native library for USB gamepad support. You can also use this to load up any other other native libraries you might need.
Initialize the MainFrame and GamePanel: The last thing this class does is initialize the MainFrame, GamePanel and sets the game's dimensions. This is the handoff from the static main entry point to the drawing routine.
There are a few other things the class takes care of for us so I recommend reading over the file carefully, try to understand everything that it does. One other aspect of the game engine is that it will automatically scale the game screen to fit inside the GamePanel dimensions. All integer positions and offsets are run through a helper class method, MmgHelper.ScaleValue. This will ensure that any values used for positioning are scaled to the game screen. It won't come into play in this game because the game screen dimensions fit perfectly inside the GamePanel dimensions.
The next class we'll take a look at is the MainFrame class. This is a local, local package, version of the MmgCore class. There isn't really any new code to add, the class simply extends the MmgCore version and calls its constructors. For more information on constructors and the use of the super keyword check out the links below.
Click here for more info on constructors.
Click here for more info on the super keyword.
Click here for more info on inheritence.
Let's turn our attention to the GamePanel class. This class is responsible for handling input, game screen events, and setting which game screen is the current game screen. Think of it as the base of the drawing aspects of the game. Because we are extending the class from the MmgCore API we get a lot of functionality for free. However, we still have a few important things we need to control to run the game.
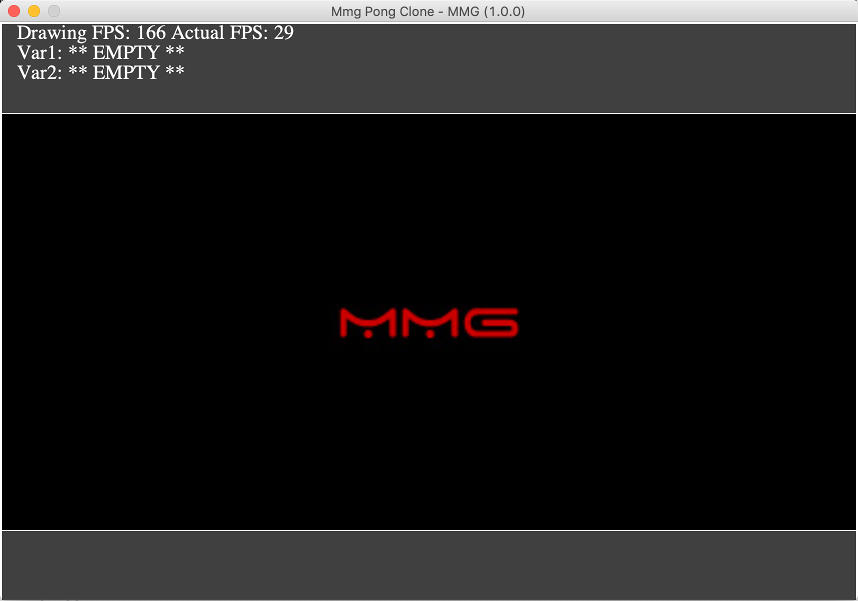
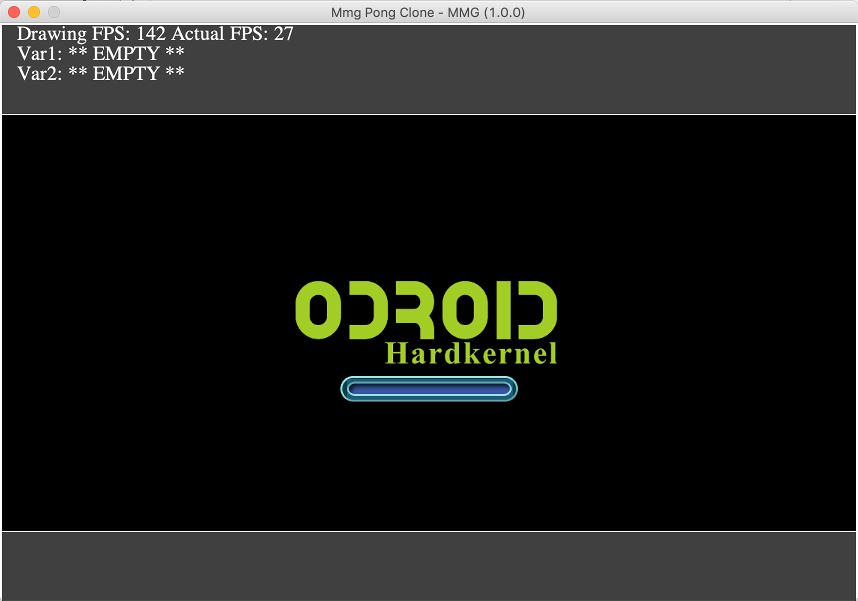
Before I cover the key class methods in the class I'll quickly demonstrate some built in functionality. The splash screen and loading screen are already defined in the MmgCore API, and properly setup by the MmgCore API's version of the GamePanel class. We are extending this class so we get some functionality for free. The next two image show the splash screen, and the loading screen. The loading screen will automatically process the auto loading images and sounds we covered earlier.
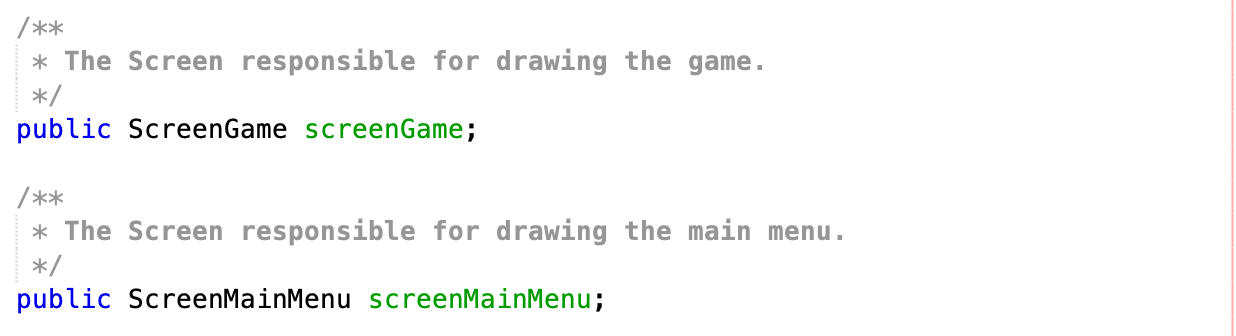
Let's take a look at the class fields first. The image below shows the two new fields needed to customize the GamePanel for running the Pong Clone game. We have a new declaration of the main menu screen, screenMainMenu, so that we can use the customized version for this game. We also have a game screen, screenGame, that is responsible for drawing and controlling the actual game play.
Next let's take a look at the constructor for this class. Remember this class extends the MmgCore class. This gives us a lot of functionality built into the class from the MmgCore API. In the constructor we want to make sure we call the super class's constructor so you'll see a call to super. Next we'll want to initialize the custom game screens for this class. You'll see screenMainMenu, and screenGame being initialized. Take a moment to notice that we are resetting the event handlers for the screenSplash and screenLoading class fields built into the GamePanel super class. Doing this will make sure that any events fired by the screens can be handled here.

The important class methods that we'll take a look at are as follows.
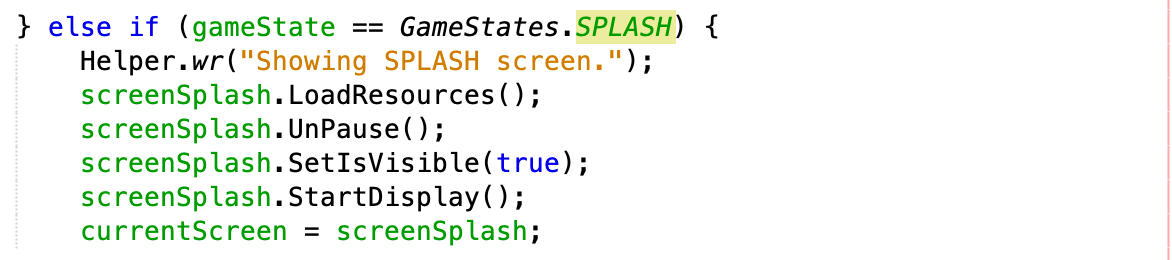
public void SwitchGameState(GameStates g): The SwitchGameState class method is used to cleanup the current state and switch the game to a new state. Game states are directly tied to games screens. When we switch to a state, say SCREEN_SPLASH for instance, we change the current game screen to the splash screen and the GamePanel will ask the splash screen to draw itself every time it is drawn to the screen.
public void HandleGenericEvent(GenericEventMessage obj): The HandleGenericEvent class method is used to handle events fired from different game screens. Events are just class method calls that are handled in a structured way by using Java interfaces. In our example game when the splash screen is done displaying after a few seconds if fires a generic event to the registered generic event handler. Remember we set this in the class constructor. This gives us a chance to respond to the event and in this case we cleanup the splash screen and then switch to the loading screen. A similar event is fired when the loading screen finishes loading the game resources, in this case we cleanup the loading screen and then switch to the main menu screen.
Let's take a look at how we clean up a game screen.

Notice how we pause the screen and unload any resources it uses, we also make sure it is invisible. Now let's take a look at how we prepare a game screen to take over, load a new screen.
That's it for this section of the tutorial in the next section we'll take a quick look at the main menu, ScreenMainMenu used to render the main menu of the game.
-- 6: Project Classes, ScreenMainMenu, ScreenGame --
Load up the ScreenMainMenu class of the com.middlemind.Odroid_Tutorial2_PongClone package. Notice that the class extends the net.middlemind.MmgGameApiJava.MmgCore.ScreenMainMenu class. That means we'll have some built in functionality from the MmgCore base class.
There are a few things that this class does. It uses an MmgMenuContainer and MmgMenuItem class to draw the menu and manage input. We won't cover all the functionality of the super class but we will quickly go over how the class is designed to use a class config file. Below is a section of code that loads up an image and positions it with default values but then also take into account the class config entries that can adjust how the screen is drawn.
key = "bmpMenuItemStartGame2p";
if(classConfig.containsKey(key)) {
    file = classConfig.get(key).string;
} else {
    file = "start_game_2p.png";
}

imgId = file;
lval = MmgHelper.GetBasicCachedBmp(imgId);
menuStartGame2P = lval;
if (menuStartGame2P != null) {
    key = "menuStartGame2pScale";
    if(classConfig.containsKey(key)) {
        scale = classConfig.get(key).number.doubleValue();
        if(scale != 1.0) {
            menuStartGame2P = MmgBmpScaler.ScaleMmgBmp(menuStartGame2P, scale, false);
        }
    }

    MmgHelper.CenterHor(menuStartGame2P);
    menuStartGame2P.GetPosition().SetY(menuStartGame1P.GetY() + menuStartGame1P.GetHeight() + MmgHelper.ScaleValue(10));

    key = "menuStartGame2pPosY";
    if(classConfig.containsKey(key)) {
        tmp = classConfig.get(key).number.intValue();
        menuStartGame2P.GetPosition().SetY(GetPosition().GetY() + MmgHelper.ScaleValue(tmp));
    }

    key = "menuStartGame2pPosX";
    if(classConfig.containsKey(key)) {
        tmp = classConfig.get(key).number.intValue();
        menuStartGame2P.GetPosition().SetX(GetPosition().GetX() + MmgHelper.ScaleValue(tmp));
    }

    key = "menuStartGame2pOffsetY";
    if(classConfig.containsKey(key)) {
        tmp = classConfig.get(key).number.intValue();
        menuStartGame2P.GetPosition().SetY(menuStartGame2P.GetY() + MmgHelper.ScaleValue(tmp));
    }

    key = "menuStartGame2pOffsetX";
    if(classConfig.containsKey(key)) {
        tmp = classConfig.get(key).number.intValue();
        menuStartGame2P.GetPosition().SetX(menuStartGame2P.GetX() + MmgHelper.ScaleValue(tmp));
    }
}
Notice how we check for the class config key first. If it exists we use it's value if not we use a default value. The position adjustments are done after the default positioning. Because we designed the class we know what type of data the class config holds. If it is a number was use classConfig.get(key).number.intValue() or classConfig.get(key).number.doubleValue() if we are expecting a string we use classConfig.get(key).string.
We'll quickly look at the main menu input handling next.
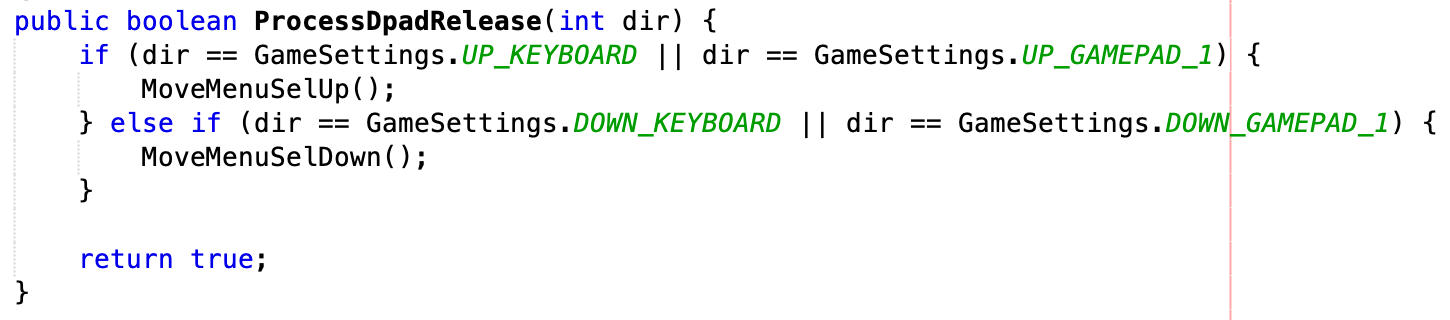
The input gets passed down from the GamePanel class. The code can be found in the MmgCore API, MmgGameApiJava project, in the GamePanel class. In this way gamepad input, GPIO gamepad input, mouse input, and keyboard input are passed down to the current game screen. If you notice in the above image that we have to differentiate the type of input we are receiving.
The next class we'll look at is the ScreenGame class. The is the main game, there is a lot going on it so I'll try to cover it in a concise manner. We'll cover the class fields, some specific resource loading, game input, and some specifics of the game rendering method. There will be a lot of code I can't cover here so please take the time to review the class and make sure you understand how it works. Before we continue let's take a look at the game screen. Take notice of all the visual elements on the screen they will all be controlled by class fields.
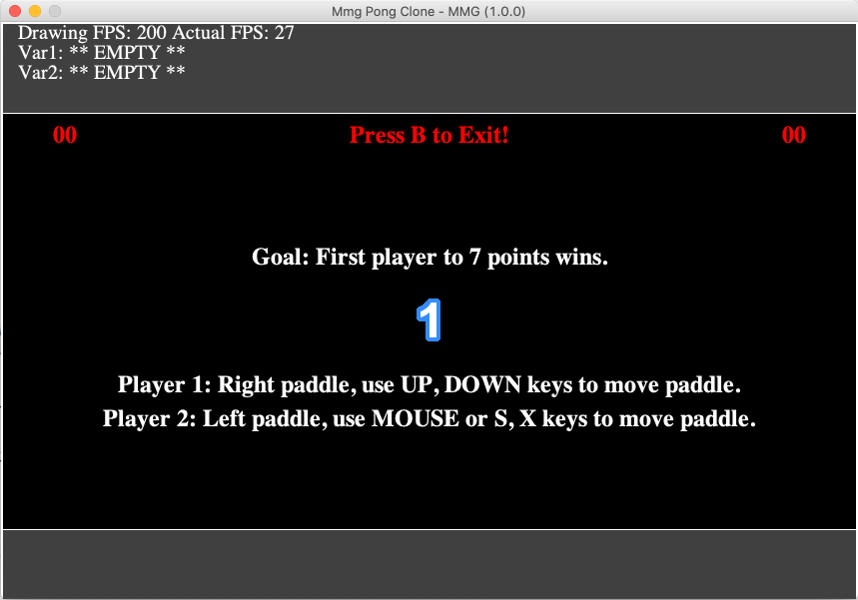
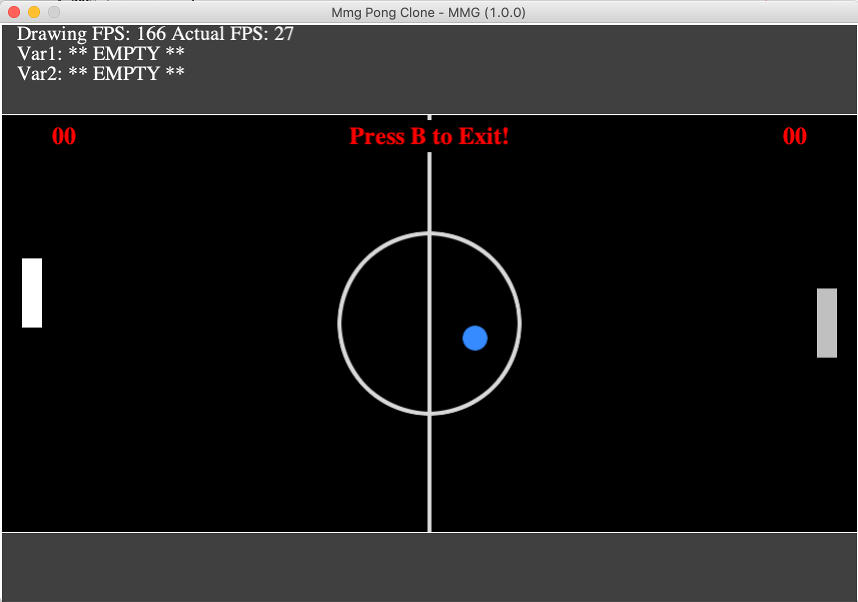
There are a few other ways the game screen can render itself, for instance the game win screen, and the single player start screen, also the count down in between scores. We'll start covering class fields next.
/**
    * An enumeration that tracks which number is visible during game start countdown and in-game countdown.
    */
private enum NumberState {
    NONE,
    NUMBER_1,
    NUMBER_2,
    NUMBER_3
};

/**
    * An enumeration that tracks which state this Screen is currently rendering.
    * Allows the Screen to support different views like in-game, countdown, game over, game start, etc.
    */
private enum State {
    NONE,
    SHOW_GAME,
    SHOW_COUNT_DOWN,
    SHOW_COUNT_DOWN_IN_GAME,
    SHOW_GAME_OVER,
    SHOW_GAME_EXIT
};

private GameType gameType = GameType.GAME_ONE_PLAYER;
private State statePrev = State.NONE;
private State state = State.NONE;

private NumberState numberState = NumberState.NONE;
private long timeNumberMs = 0L;
private long timeNumberDisplayMs = 1000;
private long timeTmpMs = 0L;
The NumberState enumeration is used to keep control what number is being shown during the count down. The count down is shown before the game starts and after each score. The State enumeration is used to control how the game screen draws itself. You'll see this in the DrawScreen class method. A switch statement will be used to control how the game is rendered given the current game state. Sometimes there will be work done in the DrawScreen method, sometimes the screen will just show different MmgObj instances like text etc. and no more work is needed in the DrawScreen class method.
The gameType class field is used to track if the game was started in one or two player mode. This information is passed in from the GamePanel class. The class fields statePrev and state are used to track the game's state and the changes to it. Notice that these are instances of the enumeration. The numberState class field is used to track the numbers being drawn during the count down part of the game screen. The next three class fields timeNumberMs, timeNumberDisplayMs, and timeTmpMs are used to track how much time went by for a given number and to change the number after a certain amount of time has passed, in this case it's timeNumberDisplayMs and it will change the number every one second.
private MmgSound bounceNorm;
private MmgSound bounceSuper;

private MmgBmp bground;
private MmgBmp paddleLeft;
private MmgBmp paddleRight;
private MmgVector2 paddle1Pos;
private MmgVector2 paddle2Pos;

private MmgBmp ball;
private MmgVector2 ballPos;
The next set of class fields are for playing sounds and drawing images. The MmgSound class is used to play different sounds while the MmgBmp class is used for drawing images to the game screen. The bounceNorm class field is used to hold the normal ball bounce sound effect. When the ball isn't at full speed this sound will be played when the ball bounce off of a paddle. The bounceSuper sound if used to play a different sound effect when the ball bounces off of a paddle and is at full speed. The ball's speed will increase with every paddle bounce until it reaches full speed.
The bground class field is used to draw the game's background. In this case we load up an image that looks like a court of some kind. It will be drawn as the background of the game. The paddleLeft and paddleRight class fields are images that are created in the game. Because they are simple rectangles we don't load up an images we create a blank bitmap in code and fill a rectangle on the image.
Position information in our 2D games is tracked by MmgVector2 objects. Because we need to call a method to get the position of MmgBmp objects we don't want to make this call every game frame if we don't have to. To avoid this we store a reference to key position information by storing the MmgBmp's position in a local class field. The paddle1Pos, paddle2Pos class fields are references to the paddleLeft and paddleRight positions. Lastly we have the ball class field which is an image of a blue ball loaded into an MmgBmp object. Again, we don't want to have to get the position of the ball frequently so we store a reference to the ball's position so we can save ourself a few method calls.
private int ballMovePerFrameMin = GetSpeedPerFrame(150);
private int ballMovePerFrameMax = GetSpeedPerFrame(425);
private int ballDirX = 1;
private int ballDirY = 1;
private int ballMovePerFrameX = 0;
private int ballMovePerFrameY = 0;

private MmgBmp number1;
private MmgBmp number2;
private MmgBmp number3;
The next set of class fields have to do with the ball's movement and the numbers that are drawn during the count down screens of the game. The ballMovePerFrameMin is the minimum speed the ball can have. Notice that the speed is converted, ballMovePerFrameMin = GetSpeedPerFrame(150). We divide the speed by the game's frame rate minus a few frames to take into account any dropped frames. The frame rate is set in the MmgPongClone class by the static field, FPS. So we convert the movement into a movement per frame. What this does is guarantee that the movement remains the same if the frame rate changes. For the most part the game will have the same movement at any frame rate, within reason if we divide by too high a number we'll have a speed per frame of 0.
The next two class fields ballDirX and ballDirY keep track of the direction the ball is moving in. We don't directly adjust the ball's speed instead we track certain aspects of the ball's movement and then calculate its next position. These class fields let us multiply the ball's movement by a 1 or a -1 to control how it reacts to screen borders or paddle. We don't use heavy calculations for the ball's bouncing we use instead simplified calculations and just negate movement in the X or Y direction depending on what the ball bounces into.
The class fields ballMovePerFrameX and ballMovePerFrameY are used to hold the calculated speed of the ball. These values are constrained by the ballMovePerFrameMin and ballMovePerFrameMax values. Lastly we have a set of class fields of the MmgBmp type that are used to draw the number images to the screen during the count down modes of the game screen. These are just like previous MmgBmp class fields we've seen, they wrap images that have been auto loaded into the image cache and draw them to the game screen during rendering.
private int scoreGameWin = 7;
private MmgFont scoreLeft;
private int scorePlayerRight = 0;
private MmgFont scoreRight;
private int scorePlayerLeft = 0;
private MmgFont exit;
private MmgBmp exitBground;

private int paddle1MovePerFrame = GetSpeedPerFrame(400);
private boolean paddle1MoveUp = false;
private boolean paddle1MoveDown = false;

private int aiMaxSpeed = 425;
private int paddle2MovePerFrame = GetSpeedPerFrame(400);
private boolean paddle2MoveUp = false;
private boolean paddle2MoveDown = false;
The class field scoreGameWin holds the value needed to win the game. Whenever a score is registered this value is checked to see if a player has one. The scoreLeft class field is an instance of the MmgFont class. Similar to the MmgBmp and MmgSound classes this class is used to load a font and display text on the screen. The scorePlayerRight class field keeps track of the right-hand side player's actual score as an integer. The scoreRight class field is another instance of the MmgFont class and is used to draw the right-hand players score on the screen. The scorePlayerLeft class field tracks the left-hand side player's actual score as an integer.
The exit class field is used to display the game exit message at the center-top of the screen. The next class field exitBground is an MmgBmp instance and draws a black rectangle behind the exit game text so that it isn't disturbed by the board background image and is easy to read. The next set of class fields has to do with the movement of paddle one, paddle one is usually drawn on the right-hand side of the screen and belongs to player one. Notice that we have a normalized speed, speed per frame, in the paddle1MovePerFrame class field. The next two class fields, paddle1MoveUp and paddle1MoveDown, are used to track the paddle's movement, up or down, based on the input received by input handling methods.
The next block of class fields is almost exactly the same as the previous set so I won't go into too much detail here. The same speed and movement tracking class fields exist. There is one difference though, we have an aiMaxSpeed class field which is used to control the speed of the paddle when the computer is playing. Notice that the computer has a slight advantage in that its paddle can move slightly faster? Since the AI is very simple, the computer will try and match the ball's Y coordinate as it moves across the screen. This is simple to implement but can lead to an easy opponent so we sped up the computers paddle movement a little to make things for difficult.
private Random rand;
private int ballNewX;
private int ballNewY;
private boolean bounced = false;
private MmgVector2 screenPos;

private int lastX;
private int lastY;
private boolean mousePos = true;

private MmgBmp bgroundPopupSrc;
private Mmg9Slice bgroundPopup;
private MmgFont txtOk;
private MmgFont txtCancel;
The rand class field is used to generate random values when necessary. We don't want to create random number generators frequently so we'll keep one ready for when we need it. The next two class fields, ballNewX and ballNewY, are used to store the calculated new X, and Y position of the ball. The bounced class field is used to track if the ball has bounced off of a paddle during the current game frame, if so a bounce sound is played. The screenPos class field is used to track the position of the screen. Because there is a development header the screen is drawn at an offset that may need to be taken into account when processing mouse coordinates. The lastXm lastY, and mousePos class fields are used to process mouse input coordinates for controlling the player two paddle.
The bgroundPopupSrc class field is an image that is used as the background for a popup that verifies if the player does in fact want to leave the game. It is used to power a the bgroundPopup class field. This is an instance of the Mmg9Slice class which is designed to convert an image into a 9 sliced tile. This allows the image to be resized with almost no distortion. Lastly we have two more MmgFont object types, txtOk and txtCancel. These are used to display text on the exit popup that tell the player what button to press to exit the game or what button to press to cancel the exit.
private MmgFont txtGoal;
private MmgFont txtDirecP1;
private MmgFont txtDirecP2;

private MmgFont txtGameOver1;
private MmgFont txtGameOver2;

private int padding = MmgHelper.ScaleValue(4);
private int popupTotalWidth = MmgHelper.ScaleValue(300);
private int popupTotalHeight = MmgHelper.ScaleValue(120);

private boolean infiniteBounce = false;
The last set of class fields is short and sweet. Let's go over them really quickly. The MmgFont instances txtGoal, txtDirectP1, and txtDirectP2 are all used to display text to the screen during some modes of the game screen. They display the score needed to win, goal, and direction to control the paddle for player 1 and player 2 if a two player game was chosen.
The next set of MmgFont instances txtGameOver1 and txtGameOver2 are used to draw the game end mode and show which player has won the game. The padding class field is used to make slight adjustments in drawing different things to the screen or in collision detection. Again, notice that we always scale the value of position variables because the game engine has the ability to scale images and screen dynamically we want all drawing position and offset values to be scaled as well. The next two class fields, popupTotalWidth and popupTotalHeight, are used to control the dimensions of the game exit prompt popup. Lastly the infiniteBounce class field is a debug variable used to set the ball to bounce infinitely and never register a score.
That wraps up the class fields that are needed to power the game complete with game intro text, directions, and a three second count down. A count down in between scores, a popup that verifies that you want to exit the game, and a game end screen that shows which player has won the game. There are a few more key pieces of code I'd like to review before we move on. Make sure you read over the class and understand anything I didn't cover explicitly. In the next section we'll cover setting up the USB gamepad and the GPIO gamepad in the last section of the tutorial.
//ScreenGame -> LoadResources method

classConfig = MmgHelper.ReadClassConfigFile(GameSettings.CLASS_CONFIG_DIR + GameSettings.NAME + "/screen_game.txt");

if(gameType == GameType.GAME_TWO_PLAYER) {
    paddle2MovePerFrame = GetSpeedPerFrame(aiMaxSpeed);
}

SetHeight(MmgScreenData.GetGameHeight());
SetWidth(MmgScreenData.GetGameWidth());
SetPosition(MmgScreenData.GetPosition());
screenPos = GetPosition();
In this code snippet we'll take a look at a few key aspect of using the game engine. The first thing I want to point out is the loading up of the class config file. Notice that it uses the GameSettings.NAME static class field which should be data driven by the game engine config XML file. The data loaded from the class config file will be used to customize and data drive how the game is rendered.
Next take a look at the gameType check. If the game is a two player game we load up a normalized paddle speed for the paddle that is driven by the AI. Following that is an important block of code. The MmgScreenData class has static fields and methods that are setup automatically as part of the initialization of the game. It holds information about the dimensions and position of the game window and the game screen. Notice that we also store the screen's position, screenPos, so that we can quickly reference the position without having to call the GetPosition() method a bunch of times.
Let's take a look at some of the class config driven loading of resources. We have seen a little bit of this when we were talking about the ScreenMainMenu class.
//ScreenGame -> LoadResources method

//Load game board config
key = "bmpGameBoard";
if(classConfig.containsKey(key)) {
    file = classConfig.get(key).string;
} else {
    file = "game_board.png";
}

lval = MmgHelper.GetBasicCachedBmp(file);
bground = lval;
if (bground != null) {
    key = "gameBoardScale";
    if(classConfig.containsKey(key)) {
        scale = classConfig.get(key).number.doubleValue();
        if(scale != 1.0) {
            bground = MmgBmpScaler.ScaleMmgBmp(bground, scale, false);
        } else {
            bground = MmgBmpScaler.ScaleMmgBmpToGameScreen(bground, false);
        }
    }

    MmgHelper.CenterHorAndVert(bground);

    key = "gameBoardPosY";
    if(classConfig.containsKey(key)) {
        tmp = classConfig.get(key).number.intValue();
        bground.GetPosition().SetY(GetPosition().GetY() + MmgHelper.ScaleValue(tmp));
    }

    key = "gameBoardPosX";
    if(classConfig.containsKey(key)) {
        tmp = classConfig.get(key).number.intValue();
        bground.GetPosition().SetX(GetPosition().GetX() + MmgHelper.ScaleValue(tmp));
    }

    key = "gameBoardOffsetY";
    if(classConfig.containsKey(key)) {
        tmp = classConfig.get(key).number.intValue();
        bground.GetPosition().SetY(bground.GetY() + MmgHelper.ScaleValue(tmp));
    }

    key = "gameBoardOffsetX";
    if(classConfig.containsKey(key)) {
        tmp = classConfig.get(key).number.intValue();
        bground.GetPosition().SetX(bground.GetX() + MmgHelper.ScaleValue(tmp));
    }

    AddObj(bground);
}
The above code shows the class config data in use with the background of the game screen. Notice that it looks very much like the example we've looked at from the main menu screen. Also, notice that the name of the file is the reference key into the cache of auto loaded files. The same thing applies to sounds too. Let's take a look at loading sounds from the sound cache.
//ScreenGame -> LoadResources method

//Load bounce normal sound
key = "soundBounceNorm";
if(classConfig.containsKey(key)) {
    file = classConfig.get(key).string;
} else {
    file = "jump1.wav";
}

sval = MmgHelper.GetBasicCachedSound(file);
bounceNorm = sval;
In the above code we test the class config rules to see if there is new information for loading a sound file. If not we load the default sound file. The name of the file is the reference key into the sound cache and is used to load a new MmgSound class instance into the game screen. Notice that we use the helper methods MmgHelper.GetBasicCachedSound and MmgHelper.GetBasicCachedBmp to load up resources from the cache created from the auto loading mechanism of the game engine.
I want to briefly review a couple of key class methods at a high level to give you more of an idea of how the class works. You'll have to do some reviewing on your own because there is a bit too much code to cover in a tutorial. Let's take a look.
private void ResetGame(): This method resets the class fields used to draw the actual game. It does things like make the exit game, left score, and right score visible. It also centers the ball and resets the paddle positions, etc.
private void SetState(State in): Similar to how the GamePanel class was able to change states and show different screens a screen might have different modes itself. The SetState method is used to change how the game screen renders itself based on the current mode. For instance the start game count down, one or two player games, the exit game prompt, etc.
public void DrawScreen(): This is an important class method that is called every time the MmgUpdate method is called. The GamePanel class takes care of calling the current screen's MmgUpdate method each game frame if the screen is not paused and is visible. On some screens there is the concept of dirty that will prevent the DrawScreen method from being called because nothing has changed. This comes in handy on screens like the main menu where you don't need to redo rendering work every game frame. On a screen like the game screen it is less useful because there is movement every frame so we would always have work to do every game frame. It is important to realize that the game screen is being redrawn every frame.
public void UnloadResources(): This class method takes care of releasing all objects that the screen uses so that the overall memory usage of the game lowers. We saw this being called in the GamePanel class when cleaning up a state before switching to a new state. The general rule here is to set all objects that the class initializes in the LoadResources class to null.
That wraps up this section of the tutorial. It would take a lot more text to review some of the methods I wanted to review but you can look them over on your own and you'll have a working example of the game to guide you. After all it is really only the ScreenGame class that runs the actual game.
-- 7: Setting Up USB Gamepad Input --
NOTE: The lower level native libraries will only work on OSX, Windows, and Linux x86.
The native driver support for USB gamepads should support most gamepads out there. There is a chance that your gamepad will not be recognized on OSX or Linux. I had one not work properly on OSX but my second attempt worked fine. In order to use the gamepad with your Pong Clone game you'll need to figure out how input buttons are mapped and what values indicate an on value and an off value. In order to do this we'll use a little helper program that's part of the MmgGameApiJava project in the net.middlemind.MmgGameApiJava.MmgTestSpace package. Look for the following static main class and right-click on it and select run with the USB gamepad connected. The native libraries do not support detection of connecting/disconnecting the game pad so you'll have to have it connected and ready.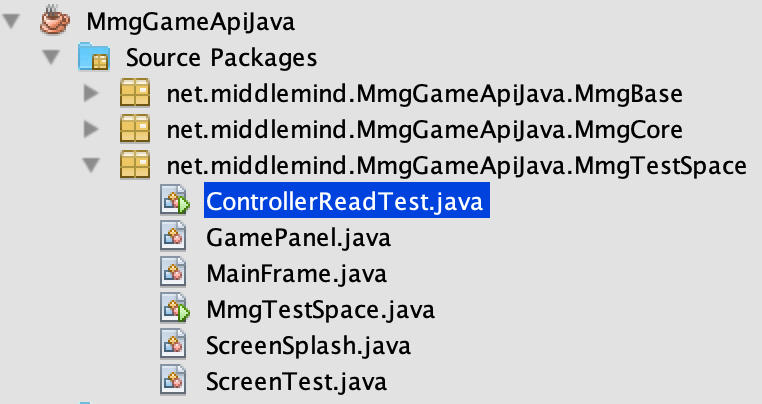
Run the program and make sure no gamepad input is activated, the program will scan all the default values for the input. It runs for a few seconds so you may have to run it a few times. Press the dpad in different directions and the software will print out the index of the input and its value as well as the value of the input while not pressed.
Because this is your environment feel free to adjust the main GameSettings file shown above. Notice that it tracks a bunch of different options for a simple USB gamepad. We're only really interested in dpad input and A, B button input. The entries to map the actual button input are pretty self explanatory but there are a few more global settings I'll quickly review.
GAMEPAD_1_ON: Set this to true if you want to turn on USB gamepad support in the game engine.
GAMEPAD_1_INDEX: The index of the USB gamepad in the list of input devices. You can get this information from the gamepad helper app shown above.
GAMEPAD_1_THREADED_POLLING: This setting is used to enabled polling the gamepad state from another thread. In this way the gamepad input data can be updated at a set interval. If this settings is set to false then the gamepad input data is updated every game frame during the update process.
GAMEPAD_1_POLLING_INTERVAL_MS: If the GAMEPAD_1_THREADED_POLLING setting is set to true then this is the interval that the gamepad input data will be updated.
Let's take a look at what an input button setup looks like. I'll review the game setting entries for one next.
GAMEPAD_1_UP_INDEX: The index of the up input in the array of inputs for the given gamepad.
GAMEPAD_1_UP_VALUE_ON: The on value of the input, i.e. the value it returns when the input is pressed/activated.
GAMEPAD_1_UP_VALUE_OFF: The off value of the input, i.e. the value it returns when the input is no pressed/activated.
GAMEPAD_1_UP_CHECK_PRESS: Set this game setting to true if you want the code to track the press event for this gamepad input.
GAMEPAD_1_UP_CHECK_RELEASE: Set this game setting to true if you want the code to track the release event for this gamepad input.
GAMEPAD_1_UP_CHECK_CLICK: Set this game setting to true if you want the code to track the click event for this gamepad input.
That's the idea of it, you can control a lot of details about the gamepad input via the GameSettings file. Just map out the gamepad input's index, on, and off values and what events you want to track.
-- 8: Setting Up GPIO Gamepad Input --
In order to take full advantage of this section you'll need to have completed the first tutorial. Specifically the GPIO setup section of the tutorial. You're going to have to follow the process for finding a GPIO pin number a second time so that you have two pins mapped out and both pins are wired up to buttons.
Tutorial 0: Java Game Development: Creating Fun With Your ODROID #1 -- Mapping Specific GPIO Pins
You'll also need the updated version of the GPIO scripts, the main change is in the btn_prep file. You can also just edit /usr/bin/btn_prep as detailed below.
GPIO Scripts v2.0.0 (Up, Down Button)Once you have pin mappings and buttons setup on your breadboard you can adjust the GameSettings file and update the entries that control the GPIO gamepad input. We'll take a look at the global settings first.
GPIO_GAMEPAD_ON: Set this to true if you want to turn on GPIO gamepad support in the game engine.
GPIO_GAMEPAD_THREADED_POLLING: Set this game setting to true if you want the GPIO gamepad to update its input at it's own interval. If this is set to false then the GPIO gamepad input data is refreshed each game frame during the update process. I recommend setting this to true because the GPIO pin state requires reading 1 byte of data from a file. So doing this every single game frame might be too much, instead poll the pin state every 20 milliseconds.
GPIO_GAMEPAD_POLLING_INTERVAL_MS: The polling interval to use if the GPIO_GAMEPAD_THREADED_POLLING value is set to true.
Next we'll take a look at the entries needed to define one input from the GPIO gamepad.
GPIO_PIN_BTN_UP: The GPIO pin to use for the UP, dpad button.
BTN_UP_CHECK_PRESS: Determines if the engine should track press button events for this GPIO button.
BTN_UP_CHECK_RELEASE: Determines if the engine should track release button events for this GPIO button.
BTN_UP_CHECK_CLICK: Determines if the engine should track click button events for this GPIO button.
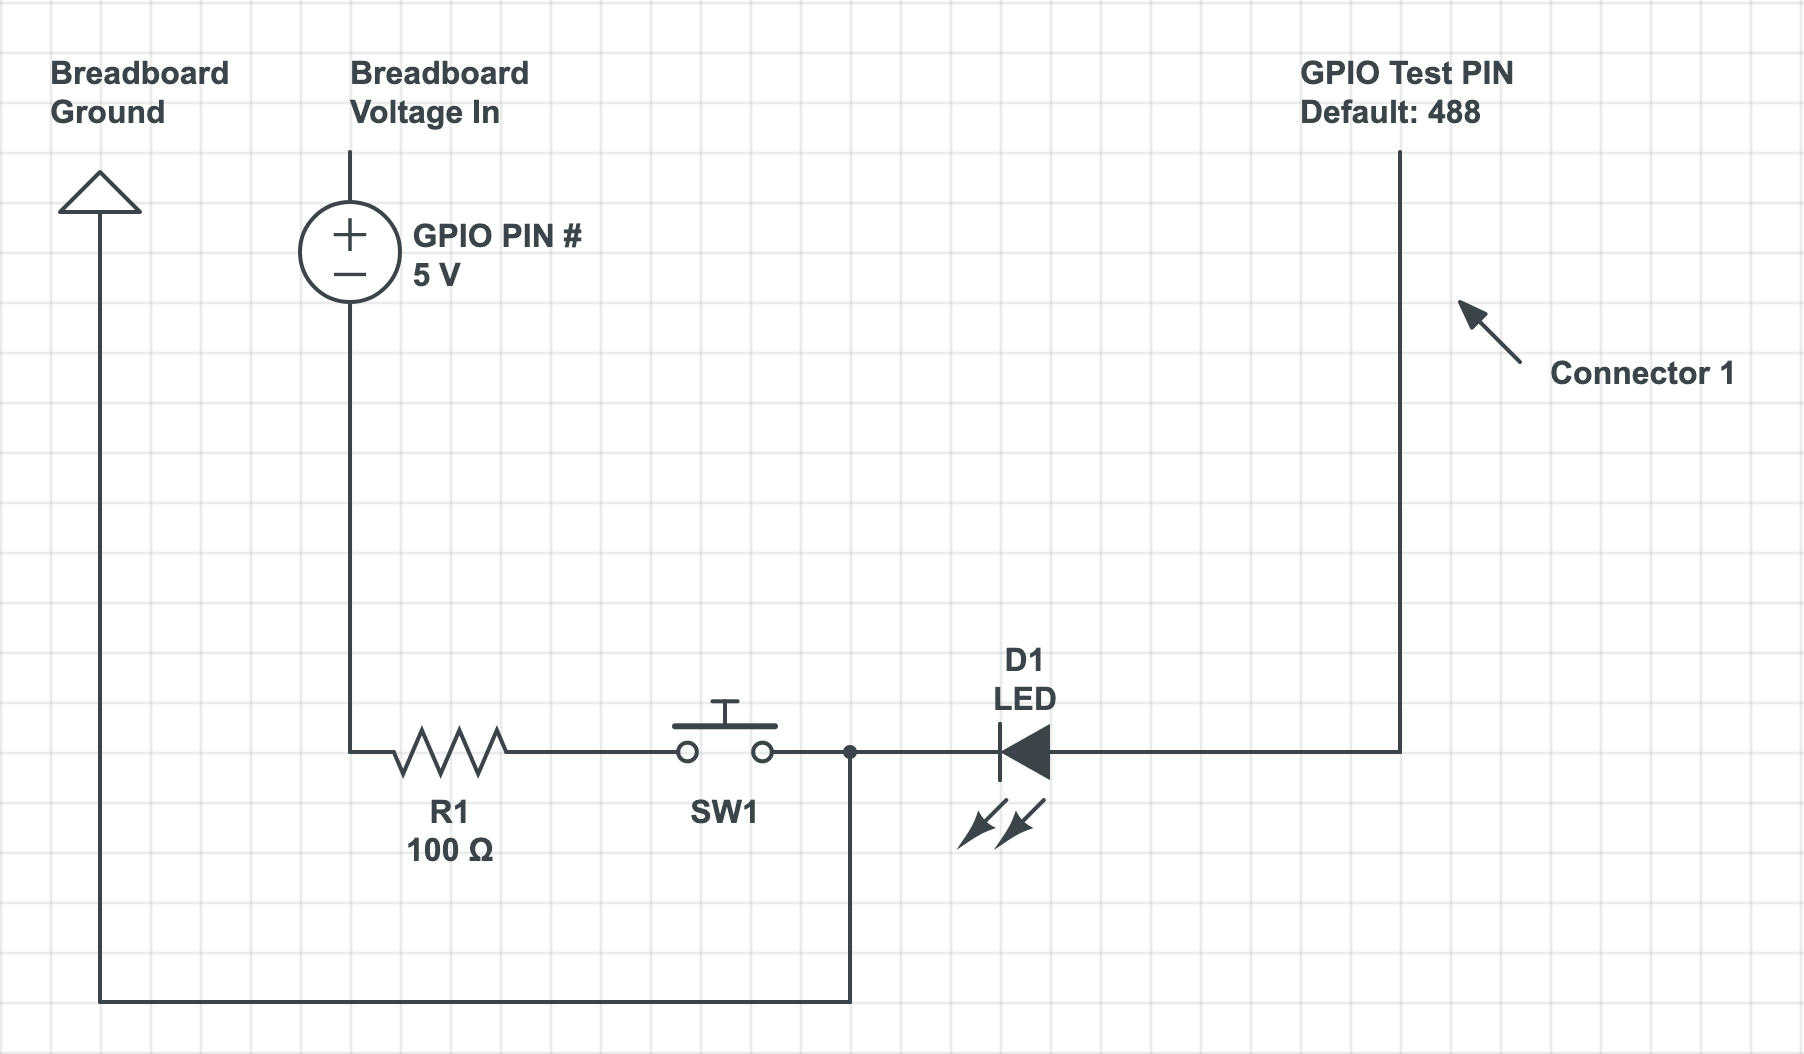
With these two new input methods the game will be able to demonstrate keyboard input, mouse input, USB gamepad input, and GPIO gamepad input. To add an additional button to the GPIO gamepad setup in the first tutorial add a second instance of the following circuit diagram but use the new GPIO pin you located using the process from the previous tutorial.
NOTE: Make sure you download the scripts file at the top of the tutorial. You'll need to update the script that the button security service opens up for you. All this is covered in the first tutorial. All you really have to do is update the btn_prep script with a new entry for the new GPIO pin number. In my case I used pin 489. So my btn_prep script will have this added segment to open up security for accessing the pin. You'll need to reboot in order for this to take effect.
TMP=489
sudo echo $TMP > /sys/class/gpio/export
sudo echo in > /sys/class/gpio/gpio$TMP/direction
sudo chmod 777 /sys/class/gpio/gpio$TMP/direction
sudo chmod 777 /sys/class/gpio/gpio$TMP/value

sudo chgrp odroid /sys/class/gpio/
sudo chown odroid /sys/class/gpio/
sudo chmod 777 /sys/class/gpio/export
sudo chmod 777 /sys/class/gpio/unexport
A picture of the GPIO gamepad with two buttons setup for up and down controls of the left-hand side player in a two player game is shown below.

Here is a screen shot of the GPIO gamepad in action actually being used to play the Pong Clone game.

-- 9: Conclusion --
I know that I wasn't able to cover all aspects of the game engine but I hope you got some value from it. If you spend some time playing the game and looking over the code you'll get even more out of this tutorial and the game engine. Now keep in mind this is a special game engine designed to teach people how to program and how to make game at the same time. The tool chain for this project is very simple NetBeans and Gimp if you wanted a simple, free, image editor.
The next tutorial will be about a game called Dungeon Trap. The game isn't finished yet but some of the configuration and setup is visible in the Netbeans projects included here. I'll cover more about the game engine and underlying APIs and demonstrate an entirely new game of a totally different genre.
Till next time!!